Table of Contents
ToggleA security camera monitor is your command center for home surveillance, the display where you watch live feeds, review recordings, and arm or disarm your system. Whether you’re protecting a front door, monitoring a garage, or keeping tabs on multiple angles around your property, the right monitor makes all the difference between casual awareness and actionable security. In 2026, homeowners have more options than ever: standalone screens, integrated smart displays, and multi-purpose tablets all work as monitors. This guide walks you through what they are, how to pick one that fits your needs, and the basics of getting it installed without calling a pro.
Key Takeaways
- A security camera monitor serves as your surveillance command center, displaying live feeds and recordings from your cameras whether hardwired to a DVR/NVR or connected wirelessly through the cloud.
- Choose between dedicated monitors for always-visible entryway surveillance or multi-purpose displays like tablets and smart TVs for flexible viewing throughout your home and remotely.
- Prioritize 1080p resolution minimum, good brightness for daylight visibility, and clear night vision display capability to ensure your security camera monitor performs reliably in all conditions.
- Proper placement and cable management during installation are critical—mount at eye level, use HDMI extenders for long runs, and always test connectivity before finalizing your setup.
- A hybrid approach combining a dedicated wall-mounted screen for quick visual checks with smartphone app access for remote viewing offers the best balance of immediate awareness and convenience.
What Is a Security Camera Monitor?
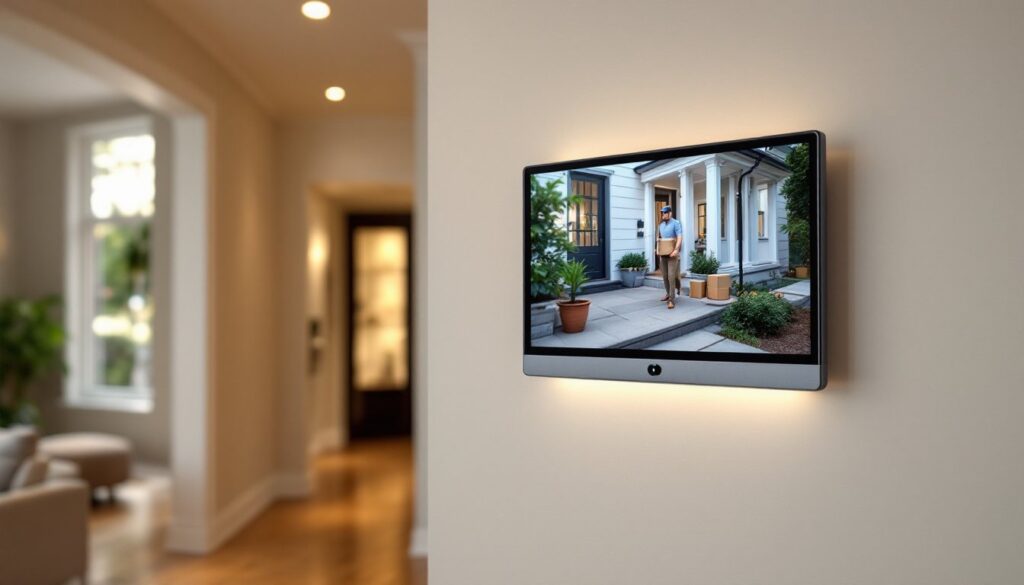
A security camera monitor is simply a display device that receives video feeds from your security cameras and lets you watch them in real time or review saved footage. It’s the visual interface between you and your surveillance system. Unlike the camera itself (which captures the image) or the DVR/NVR (the recording device), the monitor is where the action happens, where you see who’s at the door, notice something unusual, or verify that everything’s fine when you’re away.
Monitors range from dedicated 7-inch screens mounted beside your door to 55-inch smart TVs pulling feeds from your phone. Some are hardwired to a recording system: others pull footage wirelessly from cloud storage. The type you choose depends on where you want to watch (kitchen, bedroom, entryway) and whether you want dedicated, always-visible surveillance or something that doubles as an entertainment display.
Key point: a monitor alone doesn’t record anything, it’s a window into your system. You’ll still need cameras, a recording device (or cloud backup), and network connectivity to make it all work together.
Types of Security Camera Monitors
Dedicated vs. Multi-Purpose Monitors
Dedicated security monitors are built for one job: showing your camera feeds. They’re typically 7- to 10-inch screens mounted on a wall, at an entry, or beside a recording unit. They offer crisp video, quick switching between camera angles, and aren’t distracted by notifications or app updates. If you want surveillance visible at a glance every time you walk past, a dedicated screen is hard to beat.
Multi-purpose displays, your smartphone, tablet, or smart TV, work with cloud-connected systems like Ring, Wyze, or Apple Home. Set up an app, and you can watch cameras from anywhere. A smart home display (Echo Show, Google Home Hub) can show camera feeds while also handling time, weather, and voice commands. Many homeowners prefer this flexibility: your bedroom tablet shows cameras while you’re getting ready, and your kitchen TV displays them during dinner if you like.
There’s a trade-off, though. Dedicated monitors are always ready to show security: multi-purpose displays require you to open an app or speak a command. A dedicated monitor in your entryway might catch something faster than reaching for your phone. Conversely, a tablet gives you footage from anywhere in the home, or anywhere on Earth if you’re traveling.
For most homeowners, a hybrid approach works: a dedicated screen by the front door for quick visual checks, and a smartphone app for remote access when you’re out.
Key Features to Look For
Resolution and refresh rate matter more than you’d think. Look for 1080p (Full HD) minimum: 4K is overkill for most home setups but becoming standard. A 60Hz refresh rate keeps motion smooth. If you’re watching vehicle traffic or movement-based alerts, a faster screen reduces lag and makes details clearer.
Screen size depends on placement. A 7- to 8-inch screen mounted beside your front door is visible without being intrusive. A 10-inch tablet on your kitchen counter offers better visibility for multiple cameras at once. Go bigger than 15 inches, and you’re really committing to a dedicated display wall, it works, but it’s noticeable.
Look for night vision or infrared display capability. Your cameras might record in black-and-white at night, but the monitor should display those feeds clearly without washing out contrast. Brightness also matters: if sunlight hits your entryway screen, a dimmer display becomes useless at noon.
Connectivity options are crucial. HDMI input lets you wire it directly to a DVR/NVR. Wi-Fi enables cloud-based feeds without running cables. Ethernet (POE, Power over Ethernet) can power and transmit video through a single cable, which simplifies installation if you’re running new lines. Some monitors support RTSP (Real Time Streaming Protocol), which means they can pull feeds from a wider range of cameras, not just proprietary systems.
Audio capability is worth considering. A built-in microphone and speaker let you hear sounds near your cameras and talk through them (handy for greeting delivery drivers). Not every homeowner needs it, but it’s a feature that adds real value if you have an intercom-style setup.
Battery backup is useful for tablet-based solutions. A UPS (Uninterruptible Power Supply) for hardwired monitors ensures they keep running if the power dips, important for a security system you rely on.
Several home security camera comparisons and smart home device reviews detail monitor specifications and real-world performance, which can help you narrow options by your specific use case.
Installation Considerations for Your Home
Hardwired monitors (those connected directly to a DVR/NVR) need a power outlet, an HDMI or video cable run from your recording device, and ideally a spot with a clear view and no glare. Before you mount anything, trace the cable route. If it’s a long run (more than 25 feet), use an HDMI extender or switch to IP-based wireless feeds to avoid signal degradation.
Prep is everything. Use a stud finder if you’re mounting to drywall: hitting a stud or a blocking board matters for weight. Most 7- to 10-inch monitors weigh 1 to 3 pounds, so a drywall anchor rated for 5 pounds or more works fine. If you’re mounting a larger screen, consider a wall-mount bracket rated for at least 1.5 times the monitor’s weight. Drill pilot holes, not just screws, it takes 30 seconds and prevents cracking.
Cable management is half the job. Run video cables inside walls if possible (use in-wall rated cable to meet fire codes). If surface-mounted, use cable raceways or conduit to keep things clean and protect wires from foot traffic or pets. Avoid running video cables parallel to power lines: even small separation reduces electrical interference.
Wireless cloud-based monitors skip most of the hardwiring. Mount a tablet or smart display near an outlet or on a charging dock. Make sure your Wi-Fi signal reaches that location, a weak signal means buffering and delayed alerts. If your signal is spotty, a Wi-Fi extender or mesh system is worth the investment before you commit to a wireless monitor.
Height and angle affect usability. Mount an entryway monitor at eye level (around 48 to 60 inches from the floor) so you don’t have to look up or down. Angle it slightly away from windows to reduce glare. In bedrooms or living spaces, angle it downward if it’s above seating so you’re not craning your neck.
Power and connectivity finalize the install. Plug the monitor into a GFCI outlet if it’s anywhere near moisture (garage, outdoor covered areas). If running new electrical, that’s time to call a licensed electrician, don’t guess on code or safety. Use a surge protector to guard against power spikes, especially in areas prone to lightning.
Test everything before considering it done. Switch between cameras, check night vision on the monitor, and confirm audio (if applicable) works both ways. Move around your home and verify the feed refreshes smoothly on your phone or tablet if that’s part of your setup. Recent home tech trend reports highlight common installation pain points, which might help you avoid them.
Permits and professional help: Check local codes. Most residential security monitors don’t require permits, but running new electrical or cutting into walls might. If you’re unsure, a quick call to your building department saves regret later. If wiring intimidates you or you’re running cables through attics, a handyperson or electrician is worth the cost, especially for systems you’ll rely on for years.
Conclusion
A security camera monitor is the practical center of your home surveillance system. Whether you choose a dedicated wall-mounted screen or a flexible multi-purpose tablet, focus on resolution, placement, and reliable connectivity. Take time with prep work and cable routing, it’s the difference between a system that frustrates you and one you actually use. Start small, test thoroughly, and upgrade later if your needs change. Most homeowners find that even a simple monitor setup delivers real peace of mind.