Table of Contents
ToggleSpring is the ideal time to catch up on winter damage and prepare your home for the warmer months ahead. As temperatures rise and outdoor work becomes feasible again, a thorough spring home <a href="https://hearthzoneliving.com/january-home-maintenance-checklist/”>maintenance checklist helps prevent costly repairs and extends the life of major systems. Whether you’re dealing with gutters clogged by winter debris, an HVAC system that’s worked overtime, or outdoor surfaces that need refreshing, tackling these tasks now sets you up for a stress-free summer. This guide walks you through the essential spring home maintenance projects every homeowner should address before the season shifts.
Key Takeaways
- A spring home maintenance checklist prevents costly repairs by addressing winter damage to roofs, gutters, and exterior surfaces before warmer months arrive.
- Inspect your roof and gutters for damage, debris, and proper drainage—water pooling or sagging requires realignment, while damaged flashing demands professional repair.
- Service your HVAC system before cooling season by replacing air filters, clearing the outdoor unit, and scheduling a professional tune-up ($150–$300) to maintain warranty coverage.
- Pressure wash siding, driveways, and decks with 2000–3000 PSI equipment, maintaining safe distances and grain direction to remove winter grime while preventing water damage.
- Seal gaps and cracks around windows, doors, and the foundation with caulk and backer rod to block water infiltration and pest entry before they cause costly damage.
- Check outdoor plumbing—hose bibs, irrigation lines, and the main water shutoff valve—to catch freeze damage and ensure proper operation during spring watering season.
Inspect Your Roof And Gutters
Your roof and gutters are the first line of defense against water damage. Winter snow, ice, and storms can cause shingles to crack, lift, or loosen, while gutters accumulate leaves, branches, and debris that block water flow.
Check For Winter Damage
Start with a ground-level inspection using binoculars before climbing a ladder. Look for shingles that are curled, cracked, missing, or visibly damaged, these allow moisture to penetrate and cause rot in the underlayment and framing. Check for moss or algae growth, which thrives in damp conditions and can degrade shingles over time. Pay special attention to valleys (where roof sections meet), flashing around chimneys and vents, and the edges where roofing meets the gutters. If you spot damaged flashing or caulking that’s cracked or peeling, it needs replacement. For anything beyond cosmetic wear, especially structural concerns like sagging areas or significant shingle loss, call a licensed roofer. Most jurisdictions require a licensed professional for roof work, and one bad repair can void your warranty or void homeowner’s insurance claims later.
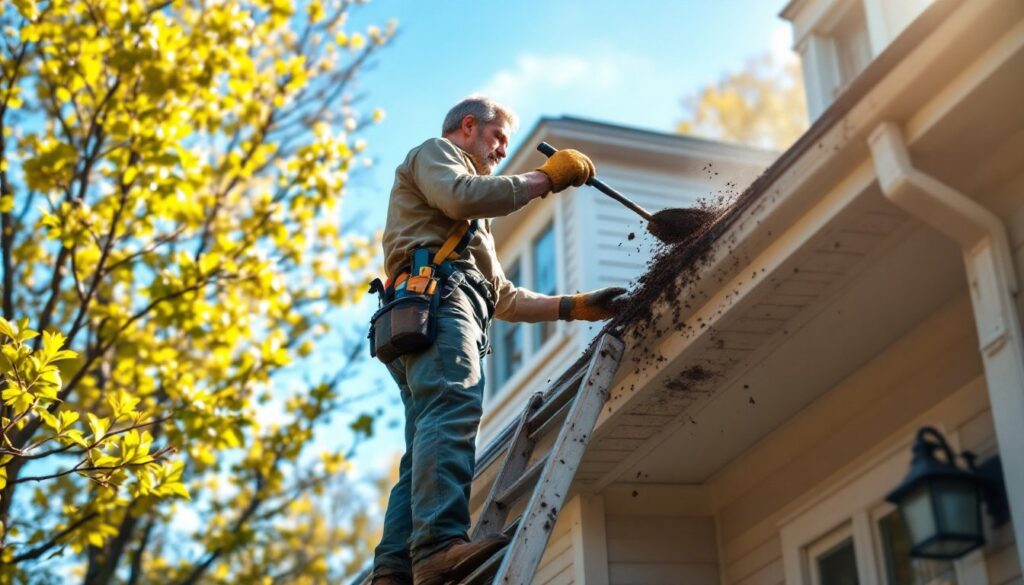
Clean And Repair Gutters
Once you’ve assessed the roof, clean the gutters. You’ll need a sturdy ladder, work gloves, a gutter scoop or old putty knife, and a five-gallon bucket. Remove debris by hand or scoop, working from one end of the gutter toward the downspout. Don’t just pile clogs in the gutter: deposit material into the bucket to avoid spillage. After clearing visible debris, flush the gutters with a garden hose to check for proper drainage and identify sagging spots. Gutters should slope slightly (about 1/8 inch per 10 feet) toward downspouts. If water pools, the gutter has sagged and may need realignment or bracket replacement, a relatively straightforward fix if you’re comfortable on a ladder, or a job for a handyperson if you’re not. Check all downspouts and ensure water drains at least 4 feet from the foundation: extension sleeves or splash blocks help direct water away and prevent basement moisture and foundation erosion. Exterior Home Maintenance Checklist: covers additional gutter and drainage strategies in depth.
Service Your HVAC System
Your heating and cooling system has been working hard all winter, and spring is the perfect time to service it before the air conditioning load kicks in. A well-maintained HVAC system runs more efficiently, lasts longer, and keeps utility bills lower. Start by replacing or cleaning the return air filter. If you’ve got a disposable 1-inch pleated filter, swap it out for a fresh one rated at MERV 8 to 11 (higher ratings trap more dust but can restrict airflow if your system isn’t designed for it). If you have a reusable foam filter, wash it gently with soap and water, let it dry completely, and reinstall it. Check that all return air vents and cold air returns aren’t blocked by furniture, curtains, or debris: this restricts airflow and makes the system work harder. Next, visually inspect the outdoor condensing unit (the noisy fan-and-coil box). Clear any leaves, pine needles, or dirt buildup by gently hosing it down from the inside out, never use a pressure washer, which can bend the delicate fins and damage the coil. Trim back shrubs and vegetation so there’s at least 2 feet of clearance around all sides. For deeper servicing, like checking refrigerant levels, cleaning interior coils, testing electrical connections, and calibrating thermostats, hire an HVAC technician. Many offer spring tune-up packages that cost $150 to $300 and can catch problems before they become expensive emergencies. Many manufacturers void warranty coverage if a unit isn’t serviced annually by a licensed professional, so don’t skip this step.
Pressure Wash Exterior Surfaces
Spring is when you can finally see the grime, mold, and mildew that accumulated over the winter months. Pressure washing removes dirt, algae, and stains from siding, driveways, patios, and decking, restoring curb appeal and preventing long-term damage. Rent or buy a pressure washer rated 2000–3000 PSI for most residential work: anything higher risks damaging wood siding, vinyl, or softer materials. For delicate surfaces like wood or older siding, use 1500 PSI or less. Always start with the lowest pressure setting and work your way up as needed. Never point the spray directly at windows, gaps in siding, or electrical outlets, as high-pressure water can force moisture into walls and cause damage. Wear safety goggles and work gloves, and keep bystanders away from the spray. When cleaning wooden decking or siding, maintain a 12-inch distance and move the nozzle parallel to the grain to avoid splintering or gouging. For driveway concrete, hold the wand at a downward angle away from the house and foundation to prevent water from being driven into joints and causing settlement. After pressure washing, let surfaces dry completely before sealing or staining wood decks. Family Handyman and This Old House offer detailed tutorials on pressure washing techniques and material-specific best practices if you need guidance.
Inspect Plumbing And Prepare Irrigation
Spring thaw can expose plumbing issues, frozen pipes that cracked, outdoor faucets that freeze-damaged, or irrigation lines that ruptured over winter. Walk around the perimeter of your home and check all outdoor hose bibs (the faucets where you connect garden hoses). Turn each on and off, looking for leaks at the connection or from the spout itself. If water sprays from the handle seal, the internal washers have likely worn out: this is a simple $5–10 replacement that takes five minutes if you’re handy with a screwdriver, or a quick call to a plumber if not. If a hose bib doesn’t shut off completely, sediment may be blocking the valve: try turning it harder or calling a professional if the valve won’t seat. For buried irrigation lines, turn on the main shutoff and inspect all sprinkler heads and emitters. Replace cracked or clogged nozzles, and adjust spray patterns so water isn’t hitting the house, driveway, or street, water-wise irrigation saves money and respects local water restrictions. Check the main water shutoff valve inside your home (usually near the meter or where the main line enters) to ensure it operates smoothly and isn’t stuck. If you can’t turn it by hand, apply a penetrating oil like WD-40 and gently work it back and forth over several days. A stuck valve is an emergency waiting to happen: if it won’t budge, have a plumber service it. Electrical and Plumbing Services: The Secret to Hassle-Free Home Maintenance provides additional guidance on plumbing inspections and repairs.
Caulk Gaps And Seal Cracks
Winter temperature swings cause materials to expand and contract, opening gaps where exterior trim meets siding, around window and door frames, and along foundation sills. Water and insects exploit these gaps, leading to rot, air leaks, and pest entry. Caulk is your defense. Use a caulk gun and paintable acrylic latex caulk for most exterior gaps: it’s flexible, adheres well, and cleans up with water. For gaps wider than 1/4 inch, first pack backer rod (a foam rope) into the space to support the caulk and ensure it bonds properly on the sides without sinking in. Cut the caulk tube nozzle at a 45-degree angle and apply a smooth, steady bead along the joint. Wet your finger slightly and smooth the bead if you’re inexperienced, which forces the caulk into the gap and creates a neat finish. For concrete cracks in the foundation or driveway, clean out loose debris with a wire brush, then use concrete caulk or self-leveling polyurethane for wider gaps. Let caulk cure per the tube instructions (usually 24–48 hours) before painting or exposing it to water. Don’t skip this work: a small gap sealed now prevents expensive water damage later. Home Maintenance Checklist Excel: provides a downloadable tracker to keep yourself organized as you work through caulking and sealing tasks across your property.